
After building six Funaro & Camerlengo HO scale scale resin freight car kits in three weeks, I thought it was time for something a little different. There have been a number of small companies making resin rolling stock kits over the years. Sunshine, Norwest, Sylvan, Westerfield, Speedwitch, Storzek, WrightTRAK, Smokey Mountain, and Southern Car & Foundry are some of the names that have produced a variety of resin rolling stock kits over the last few decades. I have kits from a few different producers, so it’ s time to try something different.
Week of May 20
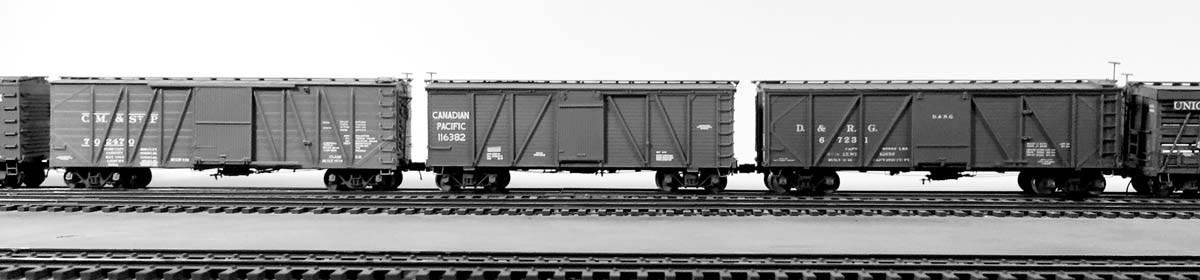
Storzek Soo Line Sawtooth single sheathed box car
Westerfield UP B-50-4 double sheathed box car
Building the previous Funaro & Camerlengo kits instilled confidence to move along. I’ve built a couple of Westerfield kits and I know they contain more small parts and require additional patience. I purchased the Storzek kit long ago and thought it would be good to build something that was produced in the mid-1980s. I opened the box and carefully unpacked the parts and laid them out on my work area. The castings were incredibly sharp and had minimal flash to remove. Some parts were cast in white metal and there were strips of wood and styrene that would be used in this build. It was apparent from the get go that this was not a typical resin freight car kit.
Storzek Soo Line Sawtooth single sheathed box car

I read through these directions twice to understand the recommended build process. I’m glad I did as there are a couple of different components to building this kit compared to the earlier kits. After removing a slight amount of flash and washing the major components, the build proceeded. The instructions recommend drilling the sides and ends for the grab irons before assembly. The next step is to install the grab irons on the ends. Click on any image here for a large version to review.
The tricky part is the grabs that go into the ladder stile that is cast onto the end. I followed the directions and drilled a hole at an angle. When installing the wire grab iron, I inserted the leg into the angled hole first and pushed the wire in until the bend was hitting the stile. Then I inserted the other leg of the grab iron into the hole near the edge of the side and pushed the wire in until the bend was hitting the casting. These grab irons are not typical. One side sits flush with the top of the ladder stile wile the other side is offset from the end the same amount as the ladder stile thickness. It’s an eye-catching feature of these unique freight cars. Carefully dab super glue (CA) onto the back of the end castings where the wires protrude. Apply glue only to the wires that come through the ladder stiles and wait a bit for the glue to set up. Take a pudding break or get some water while you wait. Then come back and adjust the other side of those grab irons so the horizontal portion on the ends are the same distance above the casting as the top of the ladder stile. I needed to overbend a bit for the grab iron to stay in the proper plane. Add dabs of CA again to the back of the casting to glue these into place. Once all is set, clip the excess wire and file the back smooth. With patience, these grab irons become a neat component of the model.
After the end grabs are attached, the car sides and ends were assembled and the roof installed.

Assembly of the under frame and brake system components was straightforward, with work completed in a short amount of time. I do recommend fitting the under frame into position before adding any of the details. It is easier to sand, file, or attach styrene strips to ensure a good fit before the details are added. All of the parts fit together very well and the directions were clear on many of the assembly steps. This kit was a real joy to build.

As per the prototype details provided with the instructions, the Soo Line rostered a decent number of these cars. The kit represents prototype box cars of these series.
- Soo 38200-39198 built 7/1920
- Wisconsin Central 132100-133398 built 7 & 8/1921
- Wisconsin Central 133400-134398 built 4/1923
- Soo 39200-40198 built 4/1923
Please note, these cars received even numbers only, so the total cars built in these number series was 2,148. Earlier orders for very similar cars totaled more than 3000. While this kit does not exactly represent those earlier box cars, the overall total of 5000-plus similar cars on Soo-related lines is a decent size fleet that I feel should be considered for representation on a pre-Depression model railroad.
Sometime in the late 1980s, the Storzek line was bought and produced under the Des Plaines Hobbies line. Around 2008, Speedwitch Media obtained the masters for this kit and produced a new version with upgraded detail parts. None of these kits are in production at this July 2013 writing. Keep your eyes open at train shows, on eBay, and on the HO Interchange list to find one of these gems.
Westerfield UP B-50-4 double sheathed box car

Westerfield kits are vital for any pre-Depression HO scale model railroad. Nearly the entire line of freight cars can be considered for the freight car fleet. Opening a Westerfield kit box usually reveals a page of instructions and a page of prototype information, all if which is offered in a 6-point typeface. Break out your Optivisor to read through the info! The resin parts are carefully wrapped in tissue paper. I like to set all of the parts on my workspace so I can find the specific details as I make my first read through the instructions.
I highly recommend reading through the instructions before starting your build on a Westerfield kit. There are often detail options for specific eras. It is important to understand what you want to build before starting these kits. With this build, I crossed off several steps in the instructions as they did not pertain to the prototype I wanted to follow. As there are many instruction steps, it is helpful to mark off those that have been completed as the build rolls along.
After reviewing the instructions and the prototype information, some flash was removed from the major castings and these were washed. All holes for grab irons were drilled on the side and end components. These wire grab irons were installed as recommended in the instructions. Within a short time the box car looked like the image above.

One part that was tricky came with the installation of the unique fish belly side frame parts. These were installed along the bottom of the sides, but they needed to be attached very carefully. I employed a few wooden clothespins to keep the parts aligned, as seen in the image above. The paper towel was used to cushion the pressure of the clothespins on delicate features cast onto the sides. I applied cyanoacrylate glue (CA) in the center portion under the door areas first and let the adhesive set up before adjusting the clothespins toward the ends to hold the long side frame in place and complete the installation.

The under frame has many individual crossties to install, along with the brake system components. This is where patience is one of the best tools to use as there are many small parts and repetitive processes in detailing the under frame. I walked away from the build a couple of times during this phase in order to relax and clear my mind.
I don’t always install the train line for the air brake system, but I thought I would add this detail. Frankly I was feeling guilty about not installing the train line as this is a wonderfully detailed model. In the end, it wasn’t as difficult to do as it seems.

From the Westerfield prototype history sheet that is included with this kit we find these B-50-4 box cars stem from a Harriman design originating the 1904. 18,790 cars were built to the original design and used on sixteen different original railroads. Many of these lines were folded into Southern Pacific and Union Pacific ownership before the Depression.
The kit I built represents a Union Pacific car that was been upgraded in 1924 with reverse corrugated Murphy steel ends. It is noted that the UP and related lines had 7,446 of the B-40-1, B-40-2, and B-40-4 classes of cars in service in 1925, although the UP had rebuilt most of the earlier -1 and -2 cars with the steel ends.
These are the kinds of numbers that turn my head when I’m trying to create a believable model fleet. In striving to model the typical, I look for a minimum of 5000 of a single car design on a prototype 1926 railroad roster in order to include it in the mix. At some point, I may need to build another to represent the Southern Pacific side of this car class and I’ve got another modeler pushing me to build one to represent the 3,000 cars the Illinois Central ran.
These last two kits were great fun to build, even with a few additional fiddly parts. I encourage readers to give a resin freight car kit a try as it will expand your modeling skills and add a unique freight car to your fleet.
That wraps up all of the models built over a five week span from April 29th to June 6th. I’ve been working on a few other kits that will be featured here soon. I will return to building my layout as it is now assembled and connected in the new home, but not quite ready to operate. Please post any question or comments below. All comments are reviewed and approved before they appear.
Great site! Good tips most enjoyably presented but how does one get to the part with old prototype car photos other than those in Bradford, PA?
Welcome to the site, Don! Nice to have you drop in for a visit.
As for the other parts to my Relics of the Rails pages (www.hansmanns.org/relics_of_rails/index.htm), I’m sorry to say I just never got around to fleshing out the other pages. I have the images somewhere here, but they need to be scanned, formatted, and the individual pages built. A few other events came along as that site was being built and my attention was pulled away. A series of moves then started up and I just never got back to building that site. Maybe someday… – Eric
Eric,
I noticed the roof supports in your Westerfield car. I hate the Westerfield design. One tip that helped me was to use a brass ridgepole instead of Westerfield’s resin one. I also make styrene cross supports pieces so that I can make the thicker and they stay in place better as I am fitting the roof support system together.