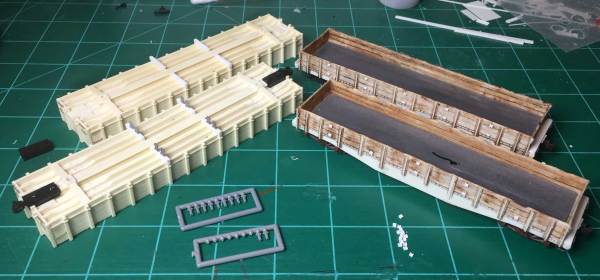
Yup, this report was filed late. Let’s catch up on a few models that have been moving along.
As you can guess from the lead image, there were gondolas involved. On the left are a pair Nickel Plate Road wood gondolas. These were a small batch produced by Yuma Car & Foundry. The prototypes were built in the 1905-08 years and served to 1936. Nearly 2500 were built and these cars were the backbone of the NKP gondola fleet until 1930 when 1300 remained on the roster. The prototypes had a steel center sill and truss rods.

I installed queenposts and truss rods on one model before running out of turnbuckles. These had double-rows of truss rods with a total of 16 queenposts per car. I installed 10-inch Tichy queenpost castings. After separating the castings, a flat file is pulled across the bottom to remove the part line then a razor blade slices the base just beside the post. For the two queenposts to stand side-by-side, the base of each needs to be trimmed so they stand tight. The needle beams are 6 x 8 styrene so attachment with styrene cement is easy.
I added Liquid Gravity between the underframe stringers to bring the car weight near three ounces. Liquid Gravity is like very small shot. Thin CA was dripped onto the material until it was soaked. Even after installing the Liquid Gravity, this car was light. I found some 26 gauge sheet metal and cut out a piece to fit under the gondola floor. The car now weighs two and a half ounces.

Here’s the most tedious part of assembling this model. It’s not the brake platform. The uncoupling hardware installation nearly brought me to tears. I had an aversion to making the funky bends to clear the brake staff. But this funky bend needs to clear the end post. My wire bending skills improved a few notches after this work. The kicker here is installing this with the FOUR EYEBOLTS. Hobbies are fun…..
PRR GR gondolas
The other set of gondolas in the lead image are PRR GR class cars. These are Funaro & Camerlengo models that I built years ago and featured in this 2014 blog post. These have been in the “Drawer of Disappointments” for too long. As I worked on the NKP gondolas, I wanted to wrap up these Pennsy cars, too.

Two details remaining were the retainer valve and line, and also the brake staff. I sliced the ratchet and pawl detail from a Tichy brake platform to use on the end sill on this model. I used a new single edge razor blade and only messed up one of the slices. As a bonus, all fingers are fine!
The prototype retainer valve details are typically mounted near the side ladder. This is different from the end locations on boxcars, reefers, and hoppers. It’s a neat detail I enjoy adding to my models.
I also installed short segments of styrene channel stock as the extra stake brackets. Many cars lost a few between shop times and it seems these were removed from Pennsy cars in later decades. Let the prototype be your guide on these extra details.

That wraps up the August and September update. I’ve kept busy so there will be more to share soon.
If you need inspiration top keep making model progress, why not attend teh upcoming Hindsight 20/20 virtual RPM? Hunter Hughson, Ryan Mendell, and Ted Culotta have been hosting virtual RPM events via the Zoom meeting platform for a few months.
Details for the upcoming October 24th Hindsight 20/20 event have been posted. The line up and registration link are at the Speedwitch Media site.
There have also been special Wednesday evening Hindsight events that focus on a single longer presentation. Registration is required to attend these Hindsight gatherings, but there is no event cost. Donations can be made via a PayPal tip jar with details on the registration link.
Thank you for visiting the blog. You can share a comment in the section below. Follow the instructions so your comment can be posted. All comments are reviewed and approved before they appear. Please share the blog link with other model railroaders. To subscribe to this blog, add your email address to the function at the bottom of the right column on the main page.


Excellent work Eric
Thanks, Paul! – Eric H.
Thanks for showing the gons, Eric. I don’t know where you find the patience to get the cut levers through four eyebolts on the NKP cars. Lovely work. And it’s a shame those cars aren’t more widely available.
Thanks, Cameron. The eyebolts are threaded onto the cut lever first. The two on each side of the end post are a bit longer and inserted into holes before the end eyebolts are positioned. Then the bends are made for the handle and the segment that hangs over the coupler. It’s very tedious work that requires patience and a steady hand. – Eric H.
Excellent work and tips. I am building similar Frisco wood gondolas from Westerfield. I will try the liquid gravity to bring the weight up.