
I use a camera to document lots of model work. My iPhone is typically used at the workbench to capture details during a build but I also like to snap photos with my DSLR to document stages of construction. It’s more of an official company photographer act. This post leads with a photo of my studio set up in the garage. I keep it simple.

Here’s another look at the photo set up with the main lights off so the iPhone can capture the scene better. I use a few basic elements.
- A buff color press sheet as a neutral background
- Three tripods – a good one for the camera and cheap ones for the lights
- Clamp lights plugged into a power strip
- 5000K LED bulbs
I can’t stress the tripods enough. I’ve worked with pieces of scrap wood clamped to a chair or a ladder, but the tripods are easiest. Keep your eyes open for these at thrift stores and garage sales. I bought one recently for $1.
I upgraded to a Nikon D7200 recently. I’ve been breaking it in snapping photos at a couple of model railroad events. Quite a few shots can be seen on the Model Railroad Hobbyist forum documenting the St Louis RPM. This new camera replaces a trusty Nikon D60 but it was time to upgrade. The new unit has a boat load of features to explore. A small photo studio for model shots is a great tool to discover the capabilities of the camera and capture your model work.


Here are three shots of the same model. The images have been cropped and reduced in size to be web friendly but no other adjustments have been made. I used a 35mm lens with the camera set on manual. I set the aperture at f22, the smallest opening on the lens. The three photos have different exposure times. The top is a 1.3 second exposure, middle is 1.6 seconds, and the last is two seconds. A good tripod is required for longer exposures.

When I take images of model progress, I review them for errors or issues that I don’t see at the workbench.

I take large size RAW format photos so I can easily zoom in to look at the smallest details. I can convert them to TIF or JPG files then edit in Photoshop to present here or in an RPM presentation.


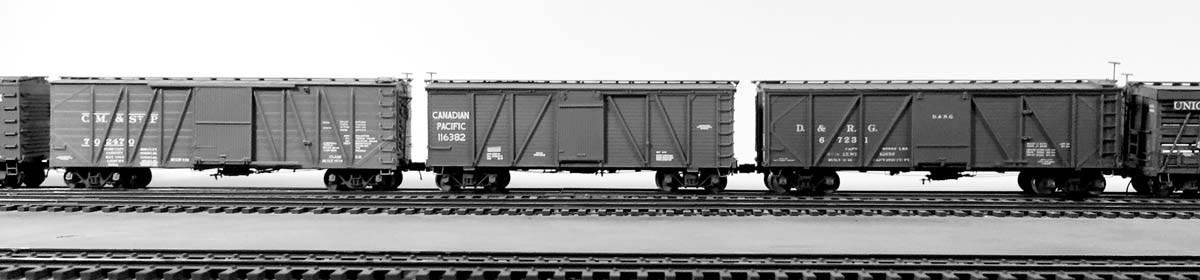
While taking photos of the B&O boxcar, I realized I have not taken roster shots of completed models. With the lights set up and the camera ready to roll, I unpacked some models that were displayed at the St Louis RPM to get a few official photos. After snapping the images and prepping them for this blog post, I see I need to install Carmer uncoupling hardware on the Milwaukee boxcar.

It was fun wearing the company photographer hat and learning more about my new camera.
Thanks for visiting the blog. You can share a comment in the section below. Follow the instructions so your comment can be posted. All comments are reviewed and approved before they appear. Please share the blog link with other model railroaders. To subscribe to this blog, add your email address to the function at the bottom of the right column on the main page.
Nice photography. I like your photo studio set up with paper as your backdrop – simple and effective. Are the lights you used just standard floodlights or are they special lights?
Mark, the lights are simple reflectors with a clamp on one end that are commonly found in hardware stores. I used LED bulbs rated at 5000K. I can’t recall the lumen rating. I like these as there is little heat emitted from the lighting and the spectrum is close to sunlight. The tripods make it easy to position the lights closer to the models. – Eric
Excellent well written and illustrated article on how simple and easy it can be to take good photos both for ourselves and to share. Any of the name brand cameras have bodies and lens offerings can make this a fun and valuable part of our hobby. Thank you for doing this Eric.
Thanks for your comment, Bill! Your photo shares have inspired me to do better with my models and photography! – Eric
Eric…
What DECAL SET [if decals were used] did you use to letter the UTLX tank car, please?
Terry
Terry, the UTLX class X-3 tank car was released by Resin Car Works a few years ago. The decals came with the kit. It is currently unavailable. – Eric
I have been using white for a background, is there too much glare with that?
Steve, it’s just a personal preference. – Eric
Eric on the B&O car what thickness did you use for the fascia boards?
Bill Vaughn
Bill, I used 1×4 strip styrene for the end and side fascia. It’s very easy to apply. – Eric
OK thanks for the info I have one to do the car is still on the way, glad to hear it will not stick out further than the roof.