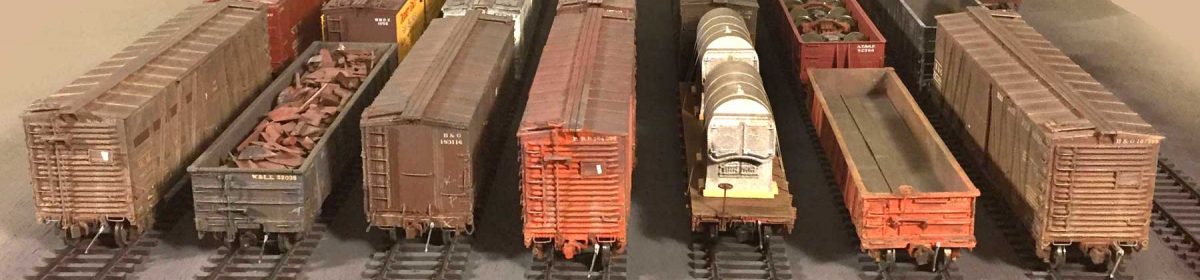

After building, painting, and decaling a freight car model, it’s time to apply weathering so it looks like it’s been traveling a few thousand miles. The lead image shows the final appearance. Let’s take a look at the steps taken to arrive there.
After the decals are applied and dry, I spray a gloss coat of Future acrylic floor finish to seal the work. This has a new product name of Pledge FloorCare Multi-Surface Finish.

The model in the top part of this image has only the gloss coat applied. The bottom model shows the model after a tinted flat coat was applied.
The flat coat started with a little thinner, then a pipette and a half draw of Model Master Acryl flat, then two drops of Vallejo burnt umber. I stirred this with a toothpick for about a minute in the paint cup. I use an Iwaata Eclipse HP-BCS siphon feed, dual action airbrush.
I sprayed one flat coat then waited a few minutes to review the model. I thought it was light so I sprayed another coat I liked the coverage after the second coat and set the model aside while I cleaned up the airbrush. I also like how the red tone of the original car color, Vallejo Cavalry brown (70.982), was cut a bit.
I think of weathering as layers that have accumulated over time. This flat coat is the first layer that cuts the bright white of the lettering and the freshness of the car color.
The prototype C&O automobile box cars came into service in August 1923 and I model November 1926. I’m often thinking about how much weathering would take effect in the years a car has been in service before my time period.

I started on the roof, randomly daubing Vallejo Model Air light grey with a microbrush to represent paint failure spots on the galvanized roof section. I kept the paint failure spots minimal. Several parts of the running boards were carefuly painted with khaki and light grey colors to represent replaced and worn boards. I applied Vallejo Model Wash dark brown with a wide brush and ended up with the appearance in the above photo.

I continued applying the wash to the rest of the car. While I liked how the roof looked, the sides seemed too dark. I rinsed out the brush and applied distilled water to remove some of the work. A cotton swab mopped up the excess using downward strokes. I snapped the above photo after this step. I was a bit concerned with the appearance, but pushed forward.

Pan Pastels were next. I scrubbed my favorite soot color onto the roof (PP 820.1 Neutral Grey Extra Dark). I also hit upper portions of the car sides and ends with a lighter application.
Road dust was applied next using PP 780.5 Raw Umber along the side sills and some lower areas. The car ends and trucks also received this color. The image above captures these steps.

Prismacolor pencil highlights are the next step. A 10% Cool Grey color is my favorite for highlighting edges. I also used a 30% Warm Grey in a few areas, mainly the scuff marks at the grab iron ladders. I used both pencils for the chalk marks. The Warm Grey presents an older mark that is not fully removed. You can see the results in the above image.
I often see route cards and remnants of cards and placards on wood sheathed cars. I use small bits of paper to represent these elements. I cut the route cards as small rectangles, while the card remnants are ripped as bits from the same strip of paper as the cards. These are simple weathering layer additions.

The car ends receive similar treatments. I use a very light grey or tan color to represent the dried mud splash from other car wheels that tend to streak on the ends. The end placard boards have usually lost some of the original car color and often bear remains of old placards.

After a couple hours of work spread over a couple of days, the weathering layers are complete. Another freight car is ready for service. It may also end up displayed with other models at an upcoming Railroad Prototype Modeler event.
Thank you for visiting the DesignBuildOp blog. To post a comment, follow the instructions in the section below. All comments are moderated. Please share the blog link with other model railroaders.
To subscribe to this blog, add your email address to the function at the bottom of the right column on the main page.
Well done Eric, thanks for sharing
Fenton
Very nice, Eric, as usual.
Dave Campbell
Beautiful car!
Terrific post and excellent guide, Mimi tutorial. Always learn things from your posts. Thanks for sharing!
Hi Eric,
Thanks for sharing the steps that you took to complete the great looking car! My plan is to start on my 1929 fleet for the Carrollton Branch. Your articles are great inspiration !
John Albaneze
Streetsboro, OH
Wait a minute!!! You are backdating to 1929??? Holy COW! – Eric H.
Do you seal all the steps that you added at the end with a flat coat or not? I have found a flat spray can lessen the effects that were achieved. Just wondering what you think, with handling the model and cleaning dust later. Larry
Thanks for your comment, Larry. I do not spray a final coat over the Pan Pastels. They stay in place. I’ve handled my models quite a bit to pack for RPM events, then unpack to display, and on and on. I’ve not seen evidence of any material shaking off the models in transit and very little is removed with handling. Pan Pastels have a binder with the color that keeps the material in place. Over the years, any model may need to be refreshed. But sealing Pan Pastels is not necessary. – Eric H.
Eric,
Could you elaborate on the use of Pledge FloorCare Multi-Surface Finish. I’ve heard of this product and understand it is used regularly by some modelers but it seems strange to use a floor product for modeling. Do you thin it for airbrushing and if so how much and with what. What advantage does this product have over traditional model gloss finishes? How durable is it? Does it go on thin so as not to mute details?
Thanks
John, it’s an acrylic finish. I read about it on a few military modeling sites over a decade ago. I picked up a bottle then and have been using it since. I can’t recall the price I paid, but it’s been a champ for me.
It does not require ANY thinning and cleans up easily using 91% isopropyl alcohol. I may have picked up the bottle because I could not find the usual hobby recommendations where I was living at that time. Since I only use water-based paints on my models, the solvent-based gloss and flat products are not considered. – Eric H.
It also has a self-leveling property that is convenient too. Means a touch up with a brush will not show marks and it can be decal ready once dry.
Excellent description, Eric. Thank you!
Eric – nice article, very informative.
Eric,
When I weather a car I first airbrush on a thinned layer of what used to be called Testors Dullcoat to protect the decals, then add India Ink diluted with alcohol, then chalk and finish with a second application of Dullcoat. I find that often the lettering turns a dull gray in the process instead of remaining whiter. Do you experience this or not and in any case how can I keep the lettering white? I was wondering if it might help to start the process with glosscoat, then add the Dullcoat before applying the India ink and chalk.
Thanks for your comment, John. First off, i do not use Dullcoat. Second, after decal application I seal the work with a gloss coat. When that is dry, I spray on a tinted flat coat. I add a couple drops of aged white or car color to some clear flat. I find this cuts the brightness of many white decals and it makes the car finish appear slightly faded and chalky. That is what has worked for me. When you review prototype photos of the 1920s, there will be few freight cars with bold, white lettering. In most cases, the lettering is subdued. In a few cases, the lettering may hardly show at all. It’s this variation of tone that I shoot for across several models.
Lastly, I haven’t used India ink in a couple of decades. – Eric H.
Thanks for the info Eric.
Forgive my ignorance, but who manufactured the kit?
Bruce, it was a private run created and cast by a friend. Not available commercially at this time. – Eric H.
Very informative information. You did a great job explaining the steps involved. The boxcar weathering is excellent. I will have to try these techniques.
How do you weather the underside of your freight cars?
Thank you for sharing this blog,.
Larry
Thanks for your comment, Larry. I don’t weather much on the underside of my freight cars. Many are painted a flat camouflage brown from a rattle can. Those are cars with separate underframes. Many more received the overall car color. I might daub some raw sienna Pan Pastel and highlight a couple spots with a light grey pencil. But overall, you can’t see much underframe detail or color so I don’t spend much time weathering that area. It follows my modeling mantra of Keep It Simple. Good luck with your weathering! – Eric H.
Thanks Eric. I have a couple of freight cars that will be in one of my display cases. Both cars have under frame details. So I want them to have some weathering. The X23 will represent a car about 2 years old. The G22A a car about 4 yards old.
Cheers,
Larry