
Many different tools are used to build the models for our railroads. We have all collected a variety of tools over the years. From pliers to knives, tweezers to paint brushes, metal rulers to screwdrivers, our tool boxes and workbenches have quite the selection at hand. I’ve used a few tools recently that are not common but they were very helpful in completing a few projects.
Grab Iron Bending Jig

Several years ago I upgraded a few plastic coal hopper models but scraping off the cast on grab irons and replacing those with wire versions. I quickly found that not all grab irons are the same size as what comes in a package from the hobby shop. I had to bend my own. Now, I’ve seen these words bring men to their knees. There are probably thousands of partially built kits on many hobbyists’ shelves because they were built to a point where the builder had to bend their own grab irons and install those. This is really pretty simple but you can’t rely on hitting the right point on your needle nose pliers every time. I built my own tool.
I used a scrap of styrene scribed for novelty siding. Measured in from the edge the length of the grab iron and drill a hole with a #78 bit. With a piece of 0.012-inch wire, make a right angle bend on one end, leaving about an eight of an inch on the short part. Insert that into the hole in the bending tool. Hold the wire in the groove and bend over the side. Cut the wire about an eighth of an inch from the new bend. Here are a couple of photos to illustrate the process.


I tried marking the back of this little tool with the length of each grab iron but those wear off with use. It’s easy enough to check the distance with a scale ruler each time you need to bend your own.
Color Wheel

I bought a color wheel earlier this year on a trip to an art supply store. I learned more about color in fifteen minutes reading the front and back of this than I had learned in thirty years of model railroading. It’s the best $5 I’ve spent on the hobby this year. If you plan to do any model painting or weathering, I highly recommend adding a color wheel to your tool box.

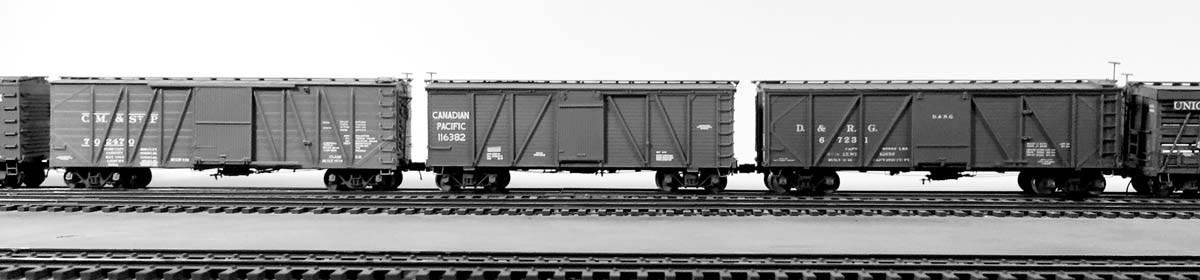
Three of the box cars in this photo were painted using the same base color of red. The Rock Island car is the base color straight from the bottle. The Pere Marquette car had a few drops of white added to the base color before being painted. The Wabash car had a few drops of black added to the base color before being painted. I did not clean the airbrush between painting these box cars. The work was done in 20 minutes. I would not have done this before I bought the color wheel.
Model Stand

How do you hold a model in order to paint it? That was a question I faced a couple of months ago as six box cars were moved to the paint booth. As the underframes were removable, I figured something can fit inside the car shell for a handle. I have lots of 2-inch blue foam left over from an old model railroad project. It’s wider than the box car interior but with some carving a chunk of the foam could make a decent model stand.

To counter the top heavy model on the foam stand, I fit the foam bases into extra model boxes that were on hand. This made it easy to move two models at once.

Those three basic tools have helped me build, paint, decal, and weather eight box car models over the last couple of months. They fall right in line with my Keep It Simple mantra for the current layout project.
Thanks for stopping by. Your questions and comments can be posted below. Please follow the instructions so your comment can be posted. All comments are reviewed and approved before they appear.
I have the same color wheel but I haven’t put it to too much use yet. How color works is frankly amazing to me and how a little bit of each color altered the output
The stuff on the back that detailed tints and shades was my eye-opener. Just by adding some white or black to box car red can alter the look of the final freight car. – Eric
Another excellent post. I will have to purchase a color wheel (next year…can’t break the resolution!).
On grab irons – neat trick with the novelty siding. I still like the double-bend/break method from Labelle Models, mentioned on a blog post a while back, though I am wrestling now with trying to bend a drop grab that way (and still end up with the little implied bolt heads and flattened metal without having to drill double the number of holes for the nbw substitutes).
Nice work again on those box cars.
How much more simple can it get with the grab iron tool? COOL!
Eric more great work. Another car body holder I read about and was going to try are cardboard tubes from paper towel and toilet paper rolls. The color wheel is a great idea and I really like how the models turn out. I have some color blindness issues but I can easily see the differences. Thanks for sharing.
Hey Rob, thanks for dropping in and commenting. I had considered the cardboard tube holders but I did not have any material handy to make a base. I had the foam and kit boxes on hand when the painting bug hit me. The tubes are a valid option but I just didn’t have the material on hand. – Eric
Eric
I assume that the C&O 9500 series autobox is an F&C kit. I have two but not built account I didn’t like the way the underframe fitted inside the carbody.
The cross ribs extended below the side sills and didn’t look right. I just put the kit away. How did you deal with the floor? Your model looks great!
Thanks Jim! Yes, that is the F&C kit. It’s a one piece body that does sit too high without modification. Using a flat end X-Acto knife, I scraped away material underside the car to create a ledge for the underframe to nestle into. It takes a little while until the underframe components sit flush with the side sill. This is repetitious and takes time but you will have a nice looking model in the end. BTW, I also used different ladders. Good luck! – Eric
Color is a mystery to me. Yes, I can see that this is oranger than that, but how to get there is the problem. Color wheel now on my wish list…
Matt, it will be one of your most used tools. – Eric
Nice photos and tips. Thank you for taking the time to share the information.
Jack Dziadul
Sanford, NC