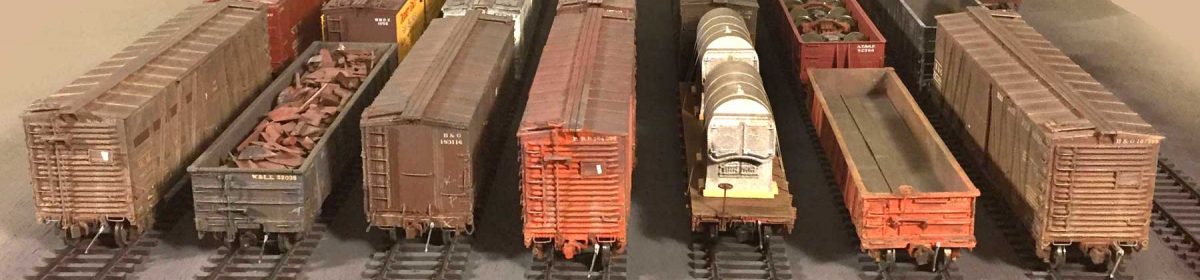

After painting several freight cars recently, it was time to decal. I want to display a few of these cars at the upcoming RPM-East prototype modeler meet. I often field questions about decal application, so let’s review some tools and processes.
I use a minimum of tools to apply decals.

A short straightedge and a new single-edge razor blade make quick work of preparing specific letters, numbers and lines of text. Often, a decal sheet has very little space between lines and a thin razor blade works much better for me than an X-Acto blade.
I keep a pair of small hairstylist scissors to trim around larger decals. These can be found at a beauty supply shop. Cuticle scissors with a curved pointed end can be a decent substitute and they are good for snipping etched metal parts from frets.
Fine tweezers are a vital tool to pick up small numbers and letters to apply to your models. Most modelers have a few pair of tweezers, but a pair with fine points helps the decal work roll along.
I keep several toothpicks at the workbench for a number of duties. When installing decals, there is always a need to carefully nudge something into position. A wood toothpick works great. A tool with a sharp point could damage the decal or accidentally mar the painted surface. Keep a classic wood toothpick or two at hand when decaling.
A small brush is used to apply decal setting solution after the decals are in place. I try to use this brush only for decal work so the bristles do not become contaminated with paint or other liquids. Brushes are cheap and last a long time when properly cared for.

Before cutting into a decal sheet, you need to compile a few important points of data for the model. As seen above, I use Post-It Notes to jot down the lettering details for my models. The reporting marks, car number, build date, builder, light weight, reweigh location and reweigh date are all determined before the blade hits the decal sheet. Often, a car number or two can be easily pulled from the number jumble on the sheet. Of course, you could end up with the same car number as the one on another model at the same display table. I try to pick a couple clusters of digits that fall into the prototype number series. It takes a few extra minutes and lining up the decals, but it’s worth it for me in the end. These notes are kept close to the work area for easy reference.
Prototype photos offer the best guidance for decal work. I always try to have a photo or a prototype car lettering diagram at hand when the decals are being applied.

I decal the car ends first then work on a car side. After the side is decaled, snap a photo with your smart phone to use as reference when you decal the other side. This minimizes handling of the model to check what you did before.
A small, clear bowl is used to soak the decals. A drop of dish detergent and some distilled water are used for the decal bath. Decals are made by a variety of companies. Do not expect every decal set to behave the same. Some take longer for the backing to soak off while others can have a very delicate thin film that can tear easily. You will get the feel of the product as you apply the first couple of decals. Work carefully and do not try to rush. Keep a paper towel handy to blot away excess water. A number of decal setting solutions are available that work to snuggle the decal film over the details.
The work isn’t difficult but smaller decals can be tedious to apply, especially if you need to change a digit on a reweigh date. I tend to cut out only what I need for half of a car side before slicing more from the decal sheet. Once the car side is decaled, take a break. Check occasionally to see if the decal film is snuggling onto the model. Apply more decal setting solution if needed. Allow the work to dry overnight before starting on the other side.

Eventually the model is fully decaled. I spray a gloss coat of Future floor finish, now known as Pledge® Floor Care Multi Surface Finish, to seal the work. This is applied using an airbrush and no thinner is necessary. Clean up is a snap with 91% Isopropyl alcohol.
A few freight cars will move into this completed lettering phase before being weathered. It’s great to watch these fresh cars in action on the layout in the days after decaling.
Thanks for dropping by and reading the blog. Share a comment in the section below. Please follow the instructions so your comment can be posted. All comments are reviewed and approved before they appear. To subscribe to this blog, enter your info for a comment and check the last box to notify of new posts by email. And by all means, please share the blog link with other model railroaders.
For soaking the decals in water, I use one of my wife’s Jenny Craig meal bowls. They are black, making it easier to see those small decals.
Nice work. And nice to be reminded of the correct to do a project. Saves a lot of mistakes. Ron S.
Through the years decaling gurus told us to gloss the car before decaling in order to prevent later silvering. You didn’t mention this step -why? Do you remove all of the glue on the decals? How often do you change the water in your dish as impurities accumulate? How do you corral and remove tiny decals from the water dish? To inhibit decal sliding do you work with the car side horizontal and keep it horizontal until the decal sets? How do weathering paints, washes and powders react to the final acrylic gloss coat?
Dick Bradley
Thanks for commenting, Dick! This decal post is a sort of continuation on the previous post, which covered painting models. The gloss coat was mentioned in that post. I use Future floor finish, as noted in this post when the decals are sealed. The gloss coat is not thinned.
I soak decals until the backing slides off easily. I think at that point the glue is mostly dissolved. I often dip the decal back into the soak then drag it along a paper towel to remove excess water before applying and positioning the decal on the model. The water is changed out after two or three cars are decaled (ends and one side of each). Very small decals are grabbed with the fine-tipped tweezers. That is a reason the tweezers were stressed as a tool. Blunt end tweezers do not easily pick up single digit decals from the soak.
The models are decaled on a horizontal surface. A freight car side is laid on a folded over paper towel to decal the other side easily. The model is left in that position until the decals are set. The end decals are applied flat, too, but these tend to set up quickly as there are only a few smaller decals to apply.
Lastly, after decaling a gloss coat is applied to seal the work. Once that has set, a flat oat is applied to prepare for weathering layers. I have not noticed any weathering washes affecting these clear coats or the decals. – Eric
My favorite tool for decal work is a needle mounted in a dowel. It’s great to hold a decal in place when you slide the backing paper off.
All good suggestions. I do find the razor blade too cumbersome, x-acto blade (new) seems more delicate, and smaller cutting surface! Always have available NEW Q-tips (roll over the decal when nearly finished; removes extra “decal set”, water, flattens the edges., etc. Have a small metal straight edge handy, Micro-Mark has very fine pointed tweezers.
Working surface…not a “hard” surface (i.e., Masonite is max). Check for alignment often!
Still having fun?
wlr
I use a paint brush to absorb the excess water off the model. Using a Q-tip seems to risk lint deposits
Beautiful work as usual! But I do wonder if there would be many cars lettered “D&RG” to be seen in 1926, as the railroad was reorganized as the D&RGW in 1924.
Correction: the D&RGW emerged in 1921.
Chris, after a reorganization not all freight cars were repainted immediately. I wanted to add a W as a new letter on a freshly repainted patch but the decal set did not have that letter in the same size as these others. A late 1920s version was available to use with a herald, but that fell beyond my era. Since this later lettering with herald came into use in the late 1920s, as per the Westerfield data sheet, I figured many cars did not get the D&RGW marks until that time. – Eric
That makes sense, especially since a car as far east as your setting may not have seen home rails in some time. Again, very nice work! Looking forward to seeing more of your projects with the new Accurail cars!